AI 4 Coding

Day 2. Advanced features: #tools, MCP, instructions, /prompts, @agents, and more…

Distributional Impact of Policies. Fiscal Policy and Growth Department

2026-04-23

Introduction

Motivation

In Day 1, we covered basics and concluded that using AI comes with the practical limitations such as:

  1. Context window size — the amount of information you can provide to the AI at once is limited.
  1. Requests — the number of interactions you can have with the AI in a are costly and we need to minimize them by optimizing the context and prompting.

  2. Hallucinations — the AI may generate plausible-sounding but incorrect or irrelevant information, which can lead to errors if not carefully managed.

Agenda for today

Today we will:

  1. Address questions from Day 1 and exercise agentic workflow on Self-study Example 3.
  2. Explore context engineering with #tools, MCP, instructions, /prompts, agents, and skills.
  3. Use Planning mode.
  4. Integrate customization into Positron’s assistant.
  5. Write instruction and prompt files.
  6. Know where to read more.

Scaffolding on Self-study Example 3

  1. Reproduce the analysis by running the code and understanding the data transformation.
  2. Analyze if and how it aligns with the DIME’s coding standards.
  3. Revise the code to align it with the standards and check the output is the same.

Prompts examples

  1. Understand
Explain to me what this analysis does. Summarise inputs and outputs, where
they come from and where they are saved. Critically reflect on strengths and
weaknesses of this code.
  1. Adjust and reproduce
Change the location of output to the current working directory and
run/debug code execution iteratively.
  1. Analyze coding standards
Analyse this code for alignment with the DIME coding standards. Identify areas of
misalignment and suggest specific revisions to improve compliance with the standards.
The standards are here:
https://raw.githubusercontent.com/worldbank/ai4coding/refs/heads/main/methods/dime-handbook-appendix.qmd
  1. Revise - Do at home.

Tools and MCP

Tools vs MCP

  • Tools — IDE functions an agent calls during chat (search code, run commands, fetch web, invoke APIs).

  • MCP — open standard connecting AI apps to external systems via separate servers exposing tools, resources, and prompts.

Tools in Positron

Tools extend agents with specialized functionality: searching code, running commands, fetching web content, or invoking APIs.

Three types of tools:

  1. Built-in tools#codebase, #problems, #web, #search, #edit
  2. MCP tools — from installed MCP servers
  3. Extension tools — contributed by VS Code / Positron extensions

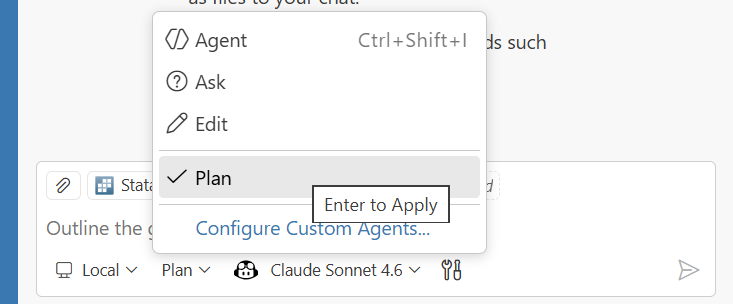
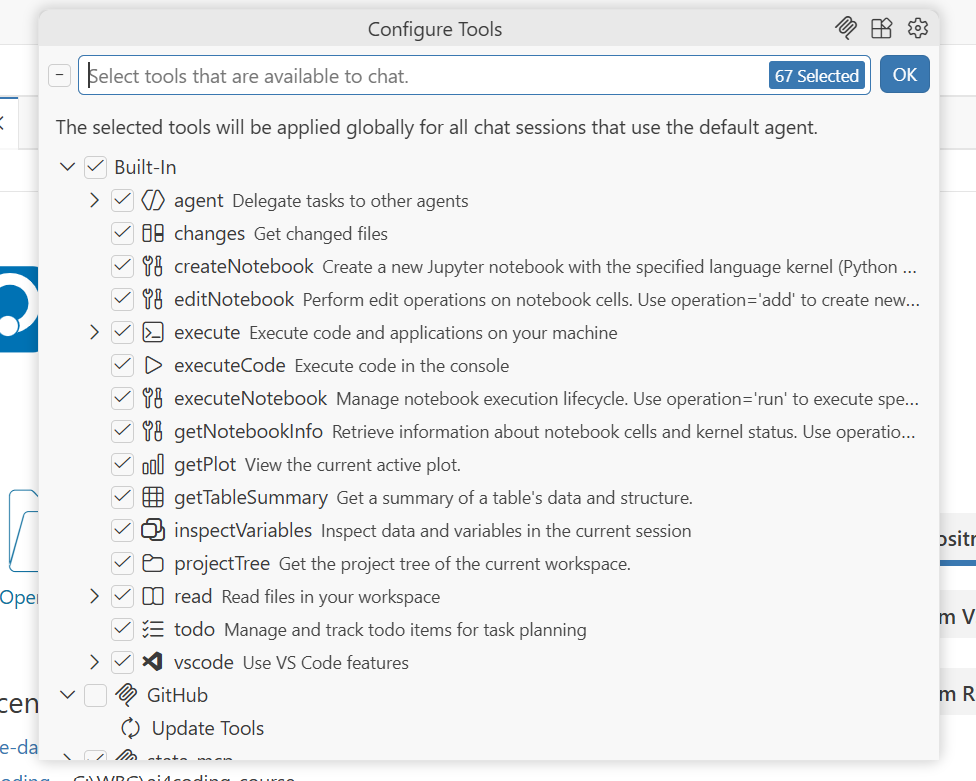
Toggle tools per-request via the Configure Tools button in the chat input.

📖 code.visualstudio.com/docs/copilot/agents/agent-tools

Using Tools in Chat

Reference tools explicitly in prompts with # followed by the tool name:

"#executeCode in the file `analysis.do`."
"Research the #codebase to find how the variable `gdp_per_capita` is calculated."
"#read the file `methods.md` and summarize the methodology."
"#inspectVariable `population` to understand its distribution and missingness."
"#search for recent papers on poverty reduction in Sub-Saharan Africa using #web."

Permission levels control agent autonomy:

Level Behaviour
Default Approvals Confirmation dialog before tool runs
Bypass Approvals Auto-approves all tool calls
Autopilot (preview) Auto-approves + auto-responds; works until done

Demo: Tools in action

  1. Continue with the same Self-study: Example 3.

  2. Open a new chat and ask it to inspect the #codebase or run code using #runInTerminal instead of #executeCode.

Run the code using `#runInTerminal` tool. If it fails, identify the error and
fix it iteratively until it runs successfully. Then, produce the output.
  1. Observe the tool being called and the response generated.

What is MCP?

Model Context Protocol (MCP) is an open standard for connecting AI applications to external systems: a USB-C port for AI.

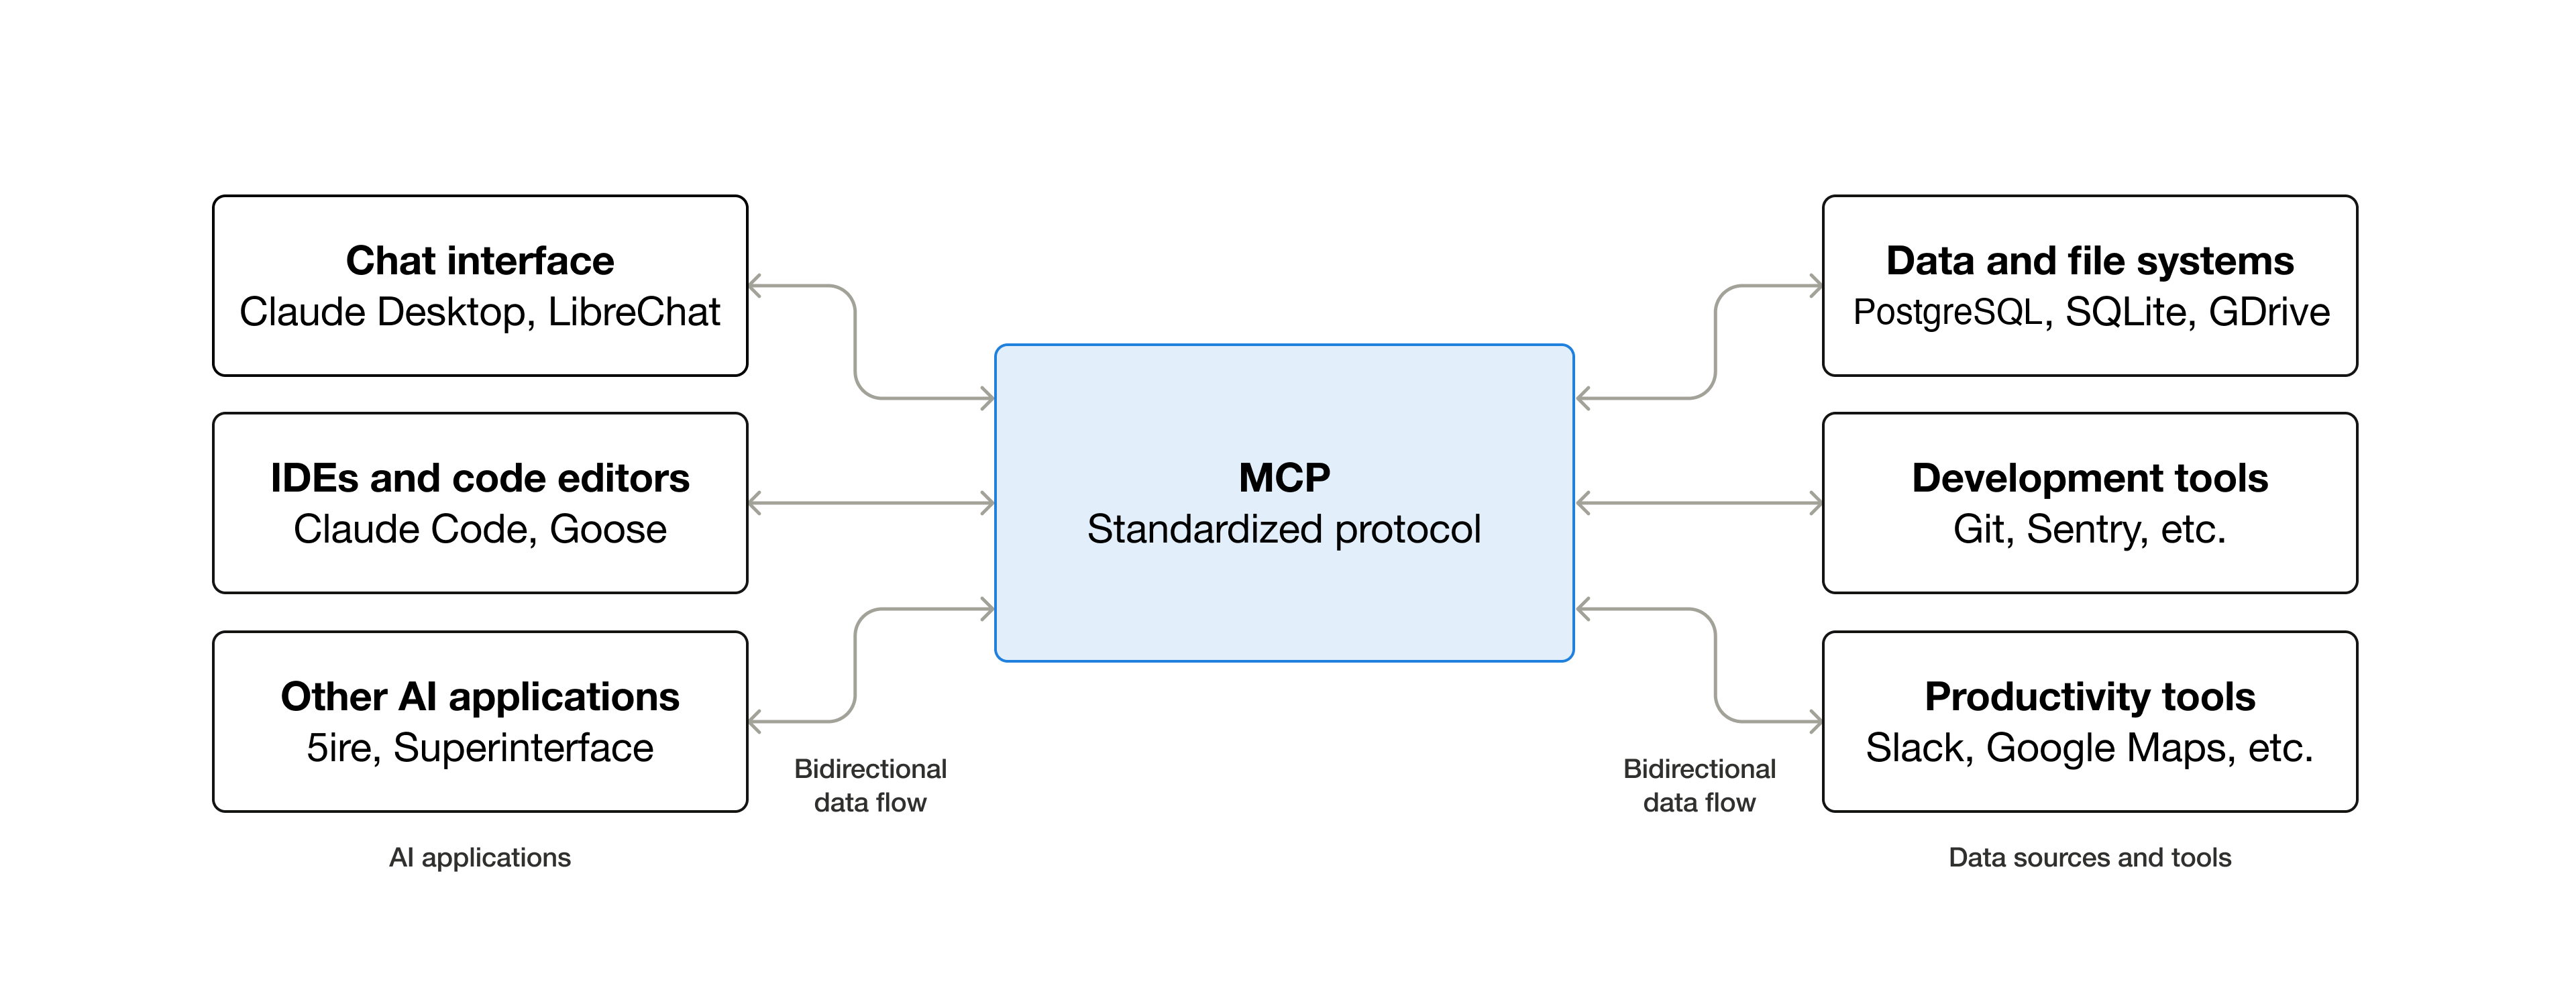
MCP servers expose specialized Tools (executable functions), Resources (contextual data), and Prompts (reusable templates) to the AI agent.

MCP @ WB (caveats)

  1. MCP are still in early stages of adoption and tooling ecosystem is evolving rapidly.

  2. MCP is not allowed in VS Code from the WB Software Center.

  3. Thus, to use MCP servers, you need to have some coding skills to set them up.

MCP examples

  • Stata for Positron uses stata-mcp server on the back end which could be configured to connect.

  • Data360 MCP — connects to World Bank Data360 platform.

  • Online citation tools, code linters, and more are being developed by the community.

MCP Servers in Positron

  1. Only by configuring .vscode/mcp.json through Command PaletteMCP: Add Server.
  2. WB Disables: Extensions view — search @mcp and install from the MCP server gallery

Ctrl+Shift+PMCP: Open User Configuration → add server config:

{
  "servers": {
        "stata-mcp": {
            "url": "http://localhost:4000/mcp-streamable"
        }
  }
}

Adding MCP server

MCP vs Tools

MCP Tools
What Open protocol / standard IDE-level concept
Scope Server exposes tools + resources + prompts Individual callable function
Runs as Separate process (local or remote) Within the agent loop
Portable Works across any MCP-compatible host Specific to VS Code / Positron
Config mcp.json or extensions gallery Built-in, extension, or MCP-sourced
Selection Server is enabled/disabled as a whole Toggled individually per request

MCP is how you connect external capabilities. Tools are what the agent uses during a chat session. MCP servers provide tools (and more).

Demo: Stata MCP

  1. No need to install any additional software, only Stata for Positron ntluong95/positron-stata that we installed on Day 1.

  2. Configure MCP server connection as described in the previous slide.

  3. Start MCP server locally by pressing Start

  4. Use #stata_run_file or #stata_run_selection in the chat as a new tool.

  5. Observe the difference in executing code via the MCP tool.

Customising the MCP connection:

Ctrl+Shift+PMCP: Open User Configuration → edit server config:

{"servers": {"stata-mcp": {
"url": "http://localhost:4000/mcp-streamable"
}}}

Adding MCP server config

Demo: MCP in action

  1. Use the same Self-study: Example 3.

  2. Open a new chat and instruct it to introduce errors in the current code:

Introduce errors in the code to make it fail. I need it for experimental and
teaching purpose to teach students how to debug it. introduce 3-5 errors of
different types that will make code fail. Make sure to not break the overall
structure of the code.
  1. Open a new chat and ask it to fix the code using the MCP tool:
Fix code using #executeCode and iterating untill it works.
  1. Now reject the changes and ask it to fix the code using the MCP tool:
Fix code using #stata-mcp
  1. Observe the difference in the process. Ctrl+Shift+PMCP: List Servers -> stata-mcp -> Show output to see the interaction with the MCP server.

Agents

What is an Agent?

An agent is an AI system that autonomously plans and executes coding tasks. You give it a high-level goal — it breaks it into steps, executes them with tools, and self-corrects when it hits errors.

Default agents in Positron:

Agent Purpose
Ask Answers & code suggestions — no execution
Edit Suggests code changes for you to apply
Agent Autonomously runs code, edits files, calls tools
Plan Creates a detailed plan before execution

What makes agents powerful:

  • 🔁 Iterative — loop until the task is done
  • 🔧 Tool-using — read files, run commands, call APIs
  • 🧠 Self-correcting — diagnose errors and retry
  • 🎛️ Customizable — create custom .agent.md files with specific tools & instructions

The Agent Loop

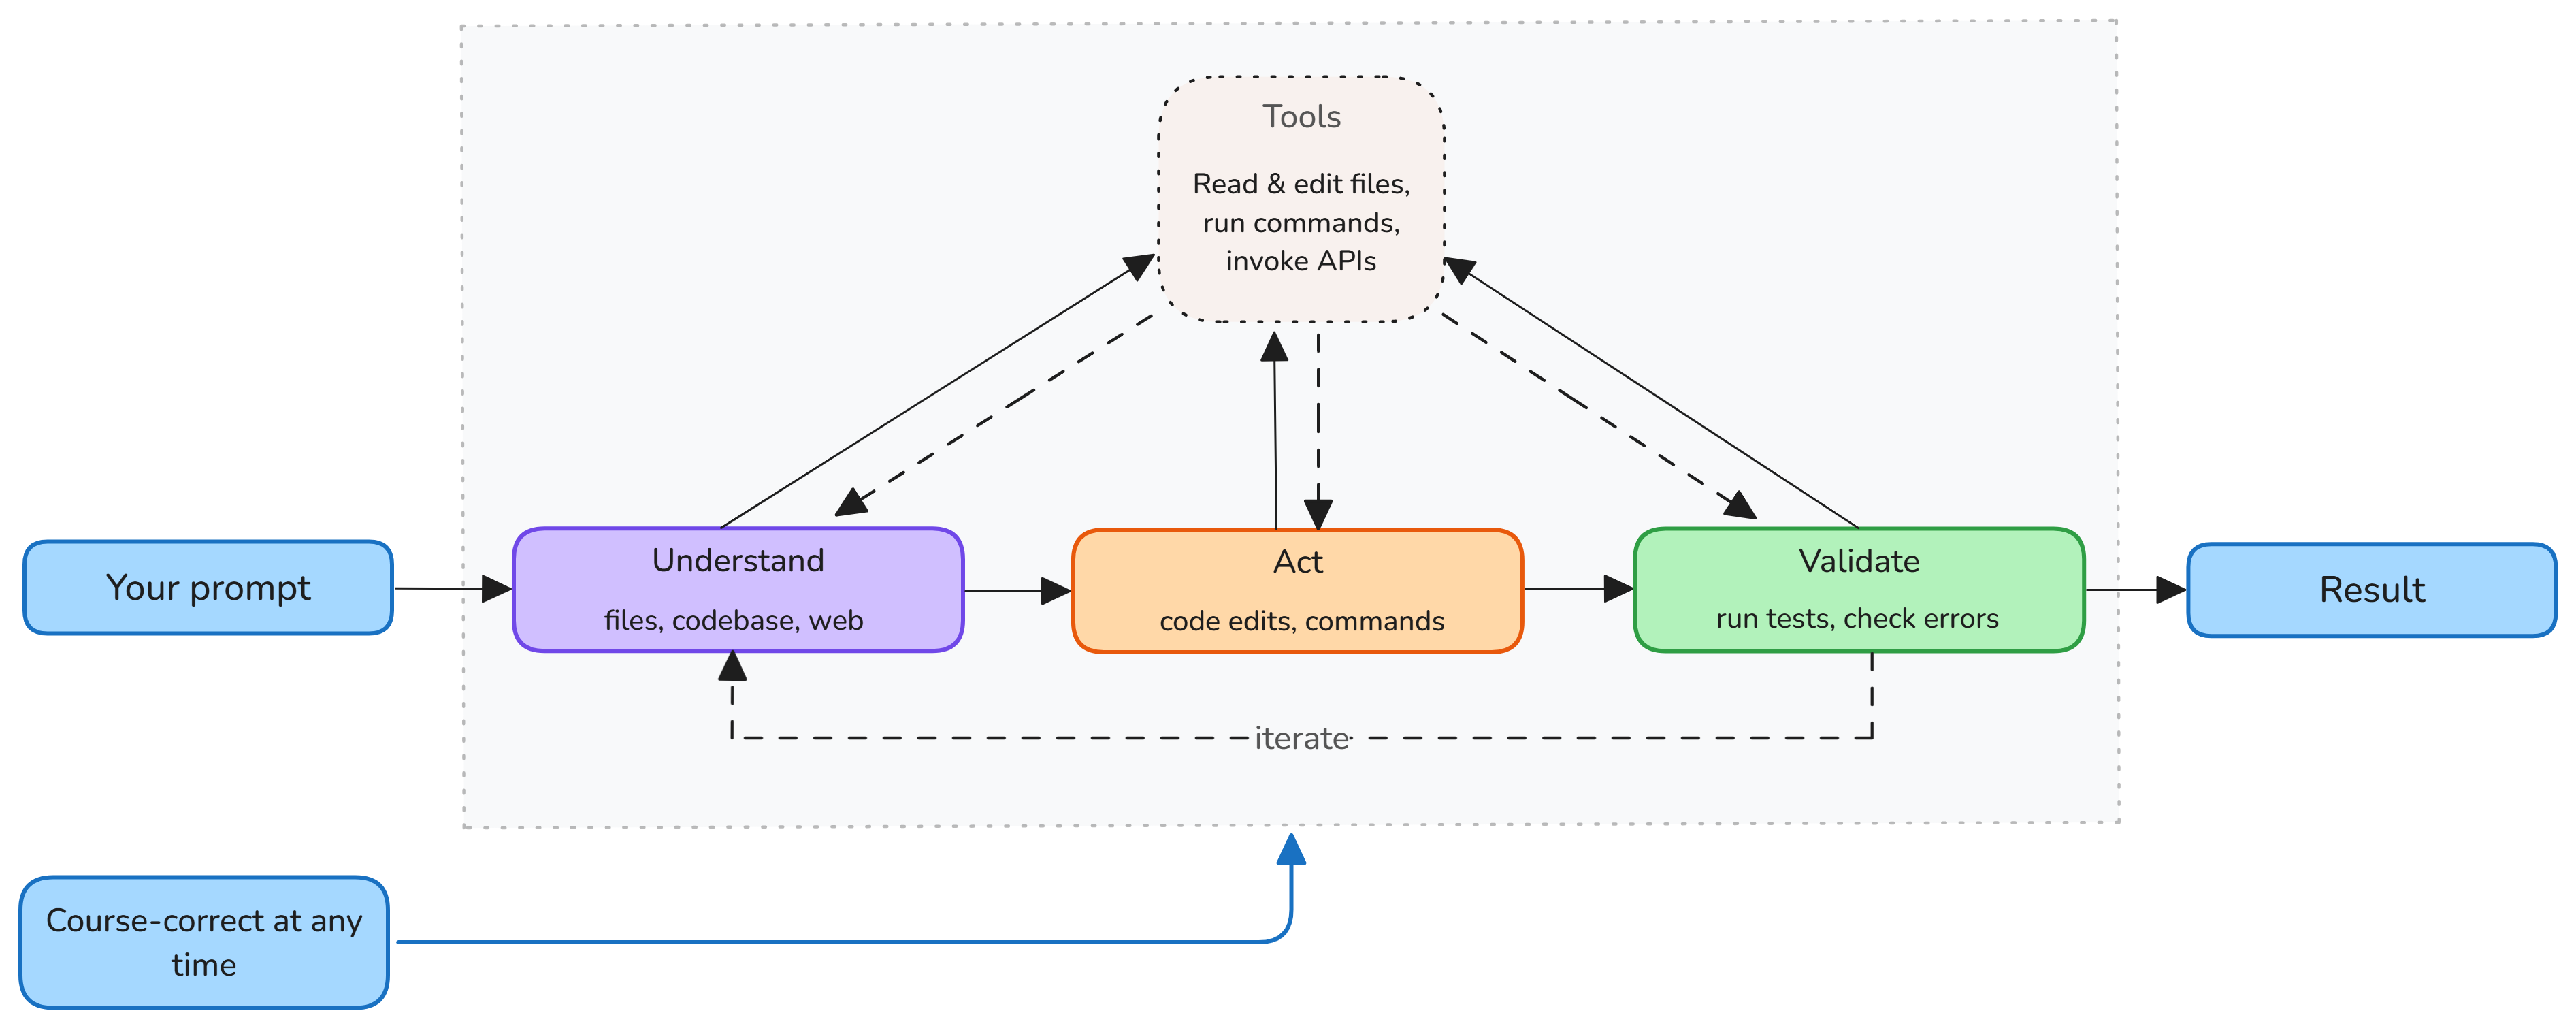
Every agent follows the same iterative cycle — Understand → Act → Validate — until the task is done.

You stay in control by:

  • Redirecting requests, adding context, or stopping at any time.
  • Accepting or rejecting tool calls, and providing feedback.

Three stages:

  1. Understand — reads files, searches the codebase, looks up docs
  2. Act — edits code, runs commands, calls tools / MCP servers
  3. Validate — runs tests, checks errors, self-corrects

At each step the model picks the next action. Tool outputs feed the next iteration.

Agent Types

Agents run in different environments depending on when you need results and how much oversight you want.
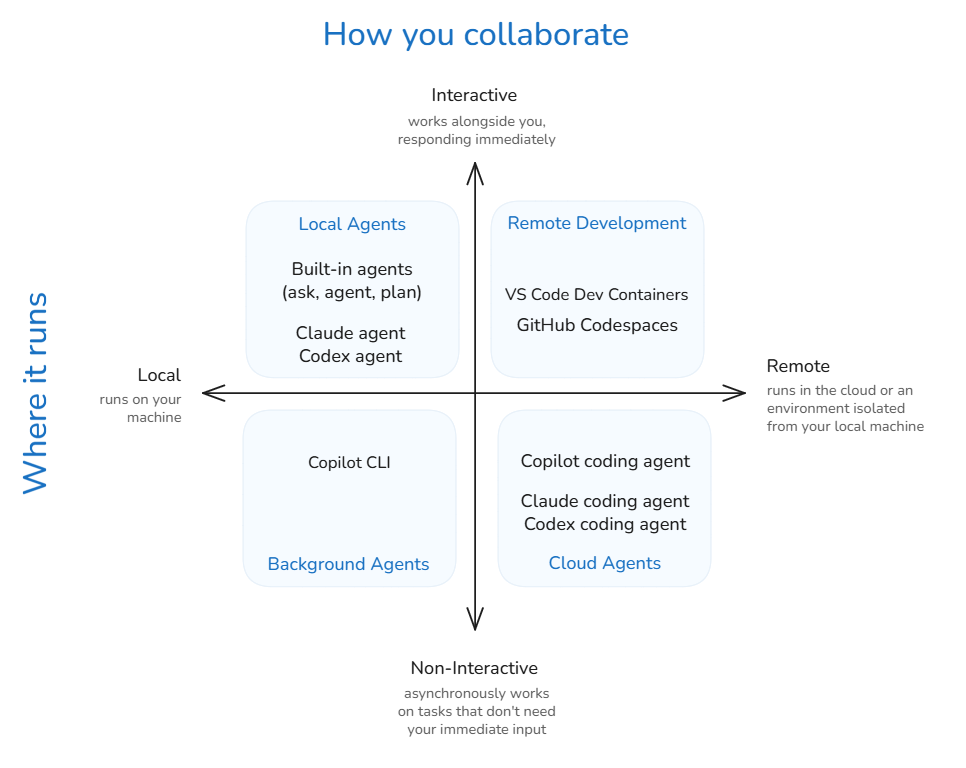
Type Where Interaction
Local Your machine Interactive in IDE
Background Your machine Autonomous, async
Cloud GitHub infra Autonomous, remote

Choosing the right type:

  • Quick fix / refactor → Local agent
  • Long build / migration → Background agent
  • CI/CD, issue triage → Cloud agent (GitHub Copilot coding agent)

Subagents

For complex tasks, the main agent can delegate subtasks to subagents — independent AI agents that work in their own context window and report back.

Why subagents?

  • Context isolation — each subagent gets a fresh context window, preventing the main conversation from overflowing with intermediate results
  • Parallel execution — multiple subagents can run simultaneously (e.g., analyze security, performance, and accessibility at once)
  • Focused results — only the summary comes back to the main agent, reducing token usage

  • Example: Plan agent

Subagent burn premium requests.

Agent Memory (new in VS Code / not available in Positron yet)

Agents use memory to retain context across conversations — no more repeating yourself.

  • Agents read and write memory files automatically as they learn your patterns.

  • Note: this is an emerging feature. It is not yet supported by Positron.

Three memory scopes:

Scope Persists
User (/memories/) Across workspaces
Repository (/memories/repo/) Across conversations
Session (/memories/session/) Current conversation

What memory captures:

  • 🎯 Your coding conventions and preferences
  • 📁 Project structure and key files
  • 🐛 Lessons from past debugging sessions
  • 📐 Architectural decisions

View memory: Chat: Show Memory Files in Command Palette. The Plan agent stores its plans at /memories/session/plan.md.

Customising Agents (overview)

Mechanism What it is When it fires Scope
Instructions (.github/copilot-instructions.md) Global rules Always on Workspace
Prompt files (.github/prompts/*.prompt.md) Reusable task or templates / On demand (/myPrompt) Per-task
Custom agents (.github/agents/*.agent.md) Persona + curated tool set User @mentions the agent Per-conversation
Skills (.github/skills/*/SKILL.md) Scoped expertise package loaded by description match Auto-matched depending on the prompt and skill description Per-request
Hooks (.vscode/hooks/*.md) Pre/post actions on agent events (save, create, command) Automatically on event Per-event
Plugins Prepackaged bundles of chat customizations Many options Project/user

Instructions, Prompts, Agents & Skills

Instructions Prompt files Custom agents Skills
File .github/copilot-instructions.md .github/prompts/*.prompt.md .github/agents/*.agent.md .github/skills/*/SKILL.md
Activation Always on On demand — /promptName Explicit @mention Auto-matched by description
Purpose Global rules & guardrails Reusable task templates Persona + curated tool set Scoped expertise package
Variables No Yes — ${file}, ${input:name} No No
Tools No No Declares allowed tools No
Scope Entire workspace Single task Entire conversation Single request
Stacking One file Multiple prompts One agent at a time Multiple skills can fire together
Typical use “Always use tidyverse /clean-survey @stata-analyst Style guide, linting

.instructions.md

Instructions are global rules injected into every agent request — no activation needed.

Copilot uses all typical instruction files, also specific to Claude Code and other IDEs.

├── .github/
│   ├── instructions/
│   │   ├── stata.instructions.md
│   │   ├── <instruction-name>.instructions.md
│   │   └── data/
│   │       └── <instruction-name>.instructions.md
│   └── copilot-instructions.md
├── AGENTS.md                    (for Other IDEs)
├── CLAUDE.md                    (for Claude Code)
└── .claude/rules/<rule-name>.md`(for Claude Code)

Coding style & language preferences

Project structure conventions

Team guardrails (“never use absolute paths”)

.github/instructions/stata.instructions.md

---
name: 'Stata Standards'
description: 'Coding conventions for Stata files'
applyTo: '**/*.do'
---
# Stata coding standards
- Follow the DIME coding conventions (see examples below).
- Use consistent indentation.
- Comment your code why, not what.
- Avoid hardcoding paths.
- ...

Use AI to create, or Ctrl+Shift+PChat: Configure Instructions

See: Positron / VS Code instructions file format, Claude rules, Repository of instructions.

Demo: Instructions in action (1)

  1. Open existing Self-study: Example 3 from the tools exercise and open chat, where we asked if the analysis aligns with the DIME coding standards.

  2. Start iterating with it asking to rewrite the code according to the DIME coding standards.

  3. Then Ask AI to summarize the coding standards it applied and create an instruction file for it.

  4. Open a new agent, provide it with the link to VS Code instructions documentation and Positron instructions documentation and ask it to revise the instruction file.

  5. Provide link to the Dime Coding Standards and ask it to align the instruction file with the standard.

  6. Ask to revise the code.

Demo: Instructions in action (2)

  1. First agent
Create an instruction file that will enforce the coding standards discussed
in the chat before. Use the DIME coding standards as a reference:
https://raw.githubusercontent.com/worldbank/ai4coding/refs/heads/main/methods/dime-handbook-appendix.qmd
  1. Second agent
Check if .github/instructions/stata.instructions.md file adheres to the DIME
coding standards. Report any gaps and misalignments and suggest improvements.
  1. Refactoring code
Refactor code to adhere to the DIME coding standards as per the instruction file.

/prompt-file

Prompt files are reusable task templates invoked on demand with /my-prompt

├── .github/
│   └── prompts/
│       ├── clean-survey.prompt.md
│       └── <prompt-name>.prompt.md
├── .claude/commands/<command-name>.md

Repetitive multi-step tasks, e.g., onboarding templates

Invoke with /clean-survey in the chat panel.

Inject dynamic context: ${file}, ${selection}, ${input:name} .

Reference tools #tool:<tool-name>

Use AI to create, or Ctrl+Shift+PChat: New Prompt File…

More: Positron/VS Code/Copilot.

---
name: clean-survey
description: 'Clean and label dataset'
agent: 'agent' # or 'ask' 'plan'
model: Claude Sonnet 4.6 # optional
tools:
  - executeCode
  - read
---
# Clean survey data

1. #read ${input:filepath}.
2. Drop observations where `consent != 1`.
3. Label all variables using codebook.md
4. Save cleaned data to `data/clean/`.

Demo: Prompt files in action

  1. After the process of the code refactoring above, ask AI to create a prompt for code upgrade to the DIME’s standard.

  2. Open chat, where you asked the code to first understand and reproduce the code, and ask this chat to create a prompt file reproduce-stata.

  3. Open new project with Self-study: Example 3 and place there .github/prompts/ and .github/instructions/ folders with the files created in the previous demo.

  4. Open a new chat and invoke the prompt file with /refactor-code or /reproduce-stata and provide the filepath to the raw survey data as input.

@agents

Custom agents are personas with specific tool access to handle specialized tasks.

├── .github/
│   └── agents/
│       ├── stata-analyst.agent.md
│       └── <agent-name>.agent.md
├── .claude/agents/<agent-name>.md (Claude Code only)

feature-builder.agent.md

---
name: Feature Builder
description: Build features by researching first, then implementing
tools: ['agent']
agents: ['Researcher', 'Implementer']
---
You are a feature builder. For each task:
1. Use the Researcher agent to gather context and find relevant patterns in the codebase
2. Use the Implementer agent to make the actual code changes based on research findings

Use AI to create, or Chat: New Custom Agent… (Ctrl+Shift+P).

Custom agents · Positron agents · Claude Code Agents.

researcher.agent.md

---
name: Researcher
description: Research codebase patterns and gather context
tools: ['search/codebase', 'web/fetch', 'search/usages']
---
Research thoroughly using read-only tools. Return a summary of findings.

implementer.agent.md

---
name: Implementer
description: Implement code changes based on provided context
tools: ['edit', 'read/terminalLastCommand']
---
Implement changes following existing code patterns. Make minimal, focused edits.

Repository of agents

Skills

A Skill is a scoped package of expertise — a SKILL.md file that the agent loads only when the request matches its description.

Project-level skills:

├── .github/
│   └── skills/
│       └── <skill-name>/
│           └── SKILL.md
├── .claude/skills/   (Claude Code)

User-level skills:

~/.copilot/skills/*/SKILL.md
~/.claude/skills/*/SKILL.md
  • Ctrl+Shift+PPreferences: Open User Settings (UI) → search for chat.agentSkillsLocations to see the path.

Loaded on match, Composable:, Portable:.

More: VS Code Skills · Anthropic Skills · Repository of skills

Demo: Skills out of the box

Stata skills are very important for AI as it had a very limited stata training base. Dylan T. Moore developed the Stata Skill: a comprehensive Stata coding style and best practices skill.

Let us import it into the project and see how it works in action, when we ask the agent to refactor the code to align with the DIME coding standards using the prompt file or in the chat.

To import the skill:

  1. Download skill files from Stata Skill GitHub.

  2. Find the skill folder for stata, which is in plugins/stata/skills/stata

  3. Copy the last stata folder into .github/skills/ in your project.

  4. Invoke a prompt to reproduce the analysis and observe if the skill is automatically loaded and applied to the request.

  5. Ask in chat: What skills are available for you? to see the list of possible skills.

Useful platforms with skills

Planning Mode: an agent

  • Creates a step-by-step plan to accomplish your request.

  • Retrieves relevant context and develops a detailed plan, which it presents for your review before proceeding with execution.

  • see: Positron Chat Agents or VSCode planning

Planning Mode

For complex tasks, jumping straight into code generation leads to wrong architectural decisions. Plan mode researches and designs before writing a single line of code.

4-phase workflow:

  1. Discovery — read-only research using codebase analysis & tools
  2. Alignment — clarifying questions to resolve ambiguities
  3. Design — structured implementation plan drafted
  4. Refinement — iterate on the plan with your feedback

How to activate:

  • Open Chat (Ctrl+Alt+I) → select Plan from the agents dropdown
  • Or type /plan directly:
/plan revising `analysis.do` to incorporate
new wave of the survey data.

In VS Code (not yet in Positron)

The plan is saved to /memories/session/plan.md — view it with Chat: Show Memory Files.

See: 📖 VS Code / agents/planning

Planning mode in action (1)

  1. Open a fresh copy of Self-study: Example 3 on your local machine.

  2. Copy into it

    • .github/instructions/ folder
    • .github/prompts/ folder
    • .github/skills/ folder
  3. Plan the revision of analysis

/plan revising `analysis_xxx.do` to 1-Reproduce it, 2-Refactor it
so that it aligns with the DIME coding standards specified in
instruction file and 3-Upgrade the analysis to incorporate new wave of the
survey data for 2024. Ask any clarifying questions you have before drafting
the plan. Then, produce a step-by-step plan for my review. If you
need to use any tools, explain why they are needed and how they are needed
and how they will work before requesting my approval.

Planning mode in action (2)

  1. Iterate to refine the plan until it looks good to you.

  2. Ask to write the plan into a prompt file.

  3. Curate the tools used by the plan.

  4. Execute the plan using the prompt file and observe the process.

Use a powerful reasoning model (e.g., claude-4.6-sonnet, claude-4.6-opus) for planning and a faster model for implementation.

Other examples

Planning and execution new analysis.

Plan and execute Example 1 (1)

Step 1. Open a copy of Self-study: Example 1 on your local machine. Step 2. Remove old code (if there is any) and leave only data in. Step 3. Connect Stata MCP server. Step 4. Load DIME Stata Style Guide as a user-wide skill. Step 5. Open chat and write a prompt:

Plan and execute Example 1 (2)

Goal: To learn how to use Positron AI assistance to write Stata code and
execute it. This code should include: data loading, descriptive statistics,
regression analysis, and visualization.

In details, these steps are:
1. Load exemplary data from data/raw/
2. Summarize descriptive statistics of all variables
3. Run a regression of income on individual characteristics
4. Create a scatter plot of income vs age
5. Create a box plot of income vs education levels
6. Save regression results and figures in an Excel file

Plan and execute Example 1 (3)

Use /plan to create a step-by-step plan for this task. Then, execute the plan
iteratively to achieve the goal. Use #stata-mcp to execute code and iterate
untill everything runs successfully. If you need to use any other tools,
explain why they are needed and how they will work before requesting my approval.
Redulsting stata do file should be named `example2-planned.do` and saved in
the root of the project.